The default configuration of cPFence is highly recommended for the majority of use cases. Upon initial scanning of your installation, cPFence will automatically apply the recommended settings based on your server specifications. However, if you require customization of cPFence to suit your specific needs, please refer to the following guidelines.
cPFence now offers a powerful, browser-based WebUI for managing your cluster. The WebUI is fully mobile-friendly, allowing you to adjust cPFence settings from any device—including your phone or tablet. You can apply changes per server by selecting the target server from the sidebar dropdown.
- Open the cPFence WebUI on your Main Control Panel server.
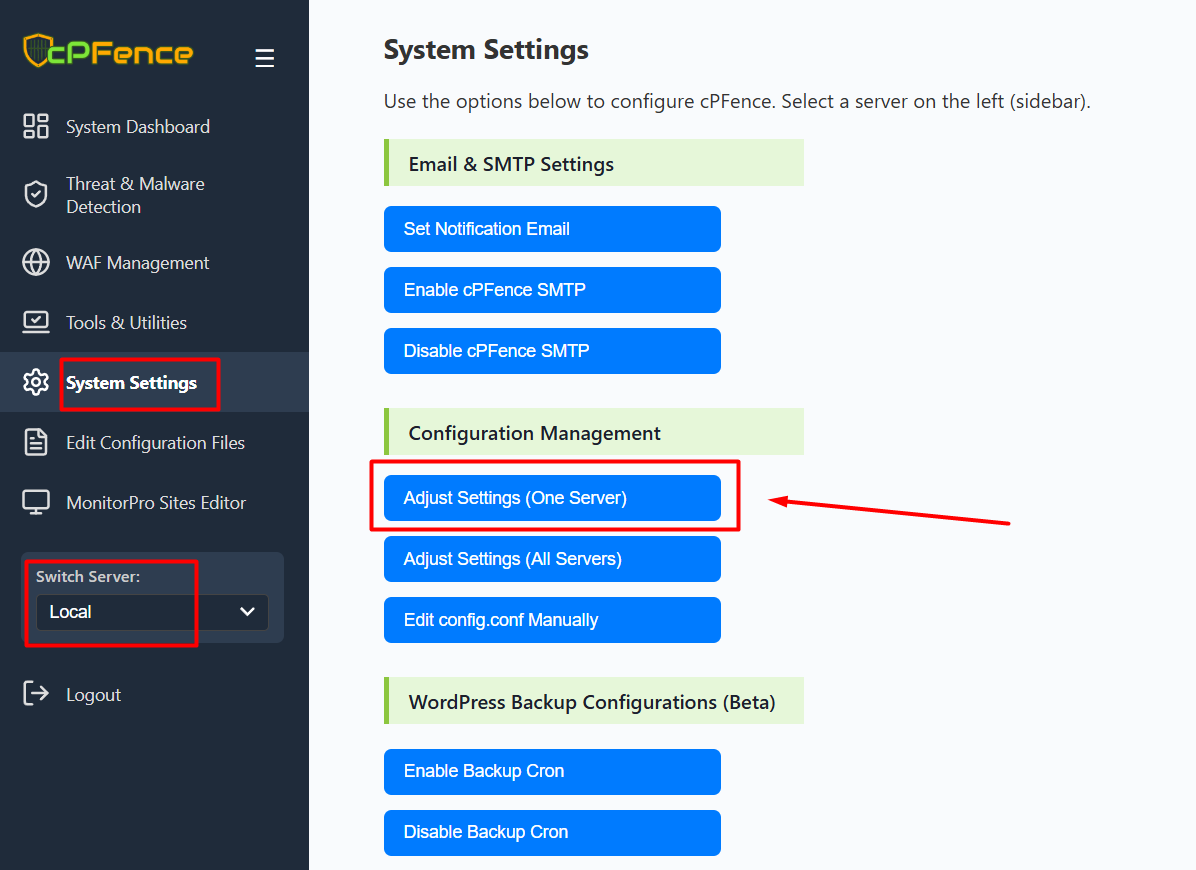
- In the sidebar, use the Switch Server dropdown to select the server you want to configure.
- Go to System Settings and click Adjust Settings (One Server) under Configuration Management.
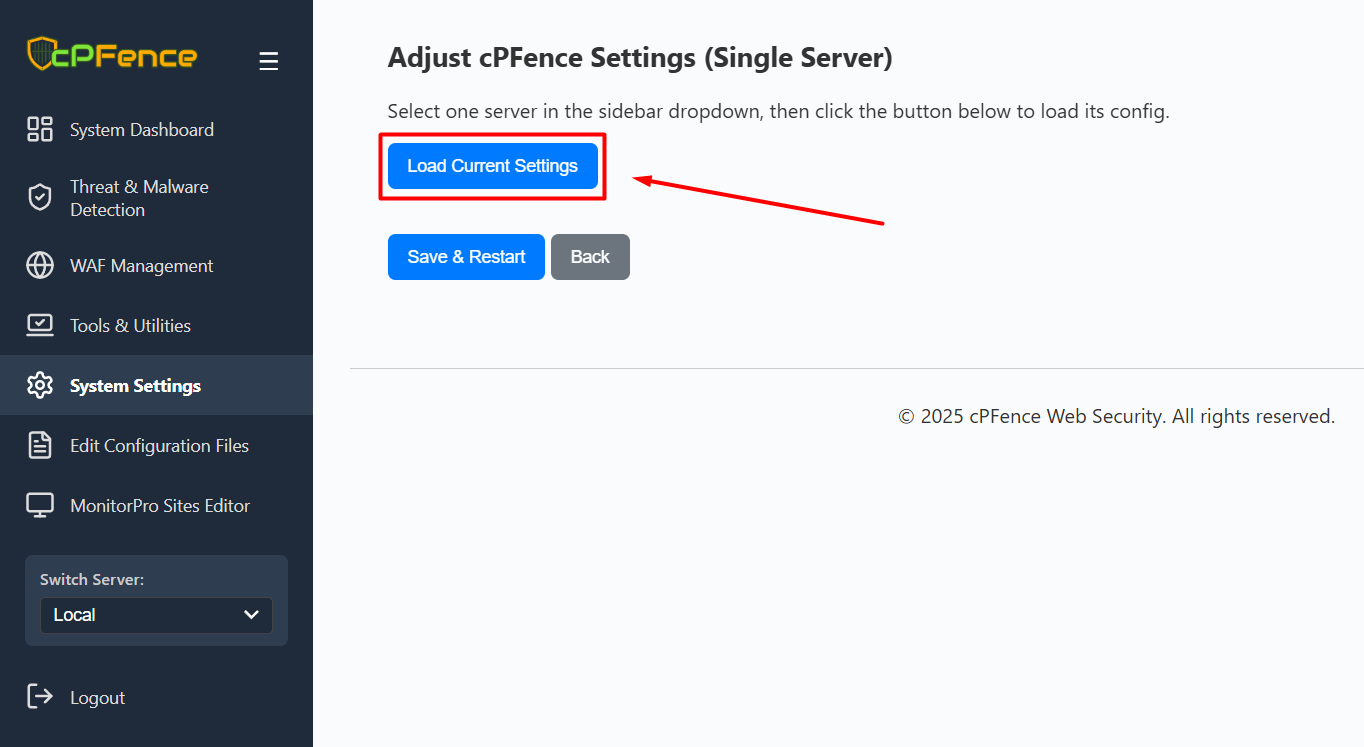
- Click Load Current Settings to view the server’s current configuration.
- Update the settings values you wish to change (see below for an explanation of each one).
- Click Save & Restart to apply your changes.
Your updated settings will take effect immediately.
Configuration Parameters
Note: the following fields are read-only in the WebUI > System Settings page
localkey– internal license key, auto-generated and not editable, leave blank.ENHANCE_API_KEY– set via Tools & Utilities > ApiMachine Bulk Tools > Set Enhance API KeyBLOCKED_COUNTRY– managed via Tools & Utilities > Country Blacklisting / WhitelistingWHITELISTED_COUNTRY– managed via Tools & Utilities > Country Blacklisting / Whitelisting
licensekey– Paste the license string you received from cPFence.localkey– Leave blank; cPFence fills this automatically when it checks the licence.ENHANCE_API_KEY– set via WebUI > Tools & Utilities > ApiMachine Bulk Tools > Set Enhance API Key. Or usecpfence --set-enhance-api-keyto store the encrypted Enhance key.CPFENCE_WEBUI– Setonto enable the central WebUI on the main control panel only.CONNECTIONS_LIMIT– Maximum concurrent connections per IP before DDoS blocking starts (100 – 120 is typical).UNDER_ATTACK– Switch toonduring an active DDoS to enable extra defences. Or usecpfence --under-attack-on.ROOTKIT_DAILY– Keeponfor an automatic rootkit scan each day.CPF_IPDB– Toggles IPDB blocking; recommended value ison.CPF_MRTP– Turns real-time malware scanning on or off.PROACTIVE_SCAN– Whenon, cPFence scans files faster. Turn it off if you are running a low-performance server (HDD, few CPU cores, etc.).AUTO_QUARANTINE– Ifon, infected files are moved automatically to /opt/cpfence/quarantined/.EMAILS_QUARANTINE– Quarantines suspicious email messages when set toon.QUARANTINE_DAYS– Defines how many days quarantined files/logs are kept before being automatically cleared. Default: 60.EMAIL_SPAM_PROTECTION– Treats spam as a threat and quarantines it.CPFENCE_SPAM_AUTOSHIELD– Enables server-wide smart spam filtering for mail, read more.SPAM_AUTOSHIELD_LIMITS– Turn on or off Spam AutoShield Outbound Limits Module.MAX_SMTP_MSGS_PER_HOUR– Maximum SMTP Messages per Hour before getting blocked.MAX_WEB_MSGS_PER_HOUR– Maximum Website Messages per Hour before getting blocked.INTEGRITY_CHECK– Runs a WordPress core checksum audit.AUTO_FILE_ACTION– Withon, unexpected WP files are quarantined automatically, read more.CHECK_FREQUENCY– Choosedailyorhourlyfor integrity checks.cPFence_wp_autoshield– Master switch that enables or disables WP AutoShield daily cron.cPFence_autoupdate_wp_sites_list– Keeps the WordPress site list updated before each cron job run.autoshield_updates– Whenon, applies WP core, theme, and plugin updates automatically.autoshield_vuln_report– Sends a weekly email report of WP vulnerabilities.autoshield_disable_wp_cron– Replaces WP-Cron with a system cron for better performance.autoshield_set_wp_secure_keys– Set WP salts daily for every site only if they are not found.autoshield_disable_wp_file_edit– Disables the built-in theme and plugin editors.autoshield_disable_wp_pingbacks– Blocks pingbacks to reduce spam and reflection attacks.autoshield_set_wp_permissions– Applies recommended file and directory permissions to WordPress.autoshield_wp_hardening– Locks critical WP files such as wp-config.php and uploads.autoshield_disable_wp_xmlrpc– Turns off XML-RPC unless it is truly required.autoshield_wp_limit_login– Adds rate-limiting towp-login.php.autoshield_wp_captcha– Adds a simple math CAPTCHA to WP login and registration forms.autoshield_wp_idle_logout– Logs out idle WP users after 120 minutes.autoshield_rename_wp_admin– Renames the default “admin” username to a safer value and sends you a report by email.autoshield_disable_xss_in_posts– Strips risky scripts and iframes from WP posts.autoshield_plugin_blacklist_removal– Deletes plugins found in your blacklist file. (/var/log/cpfenceav/blacklisted-wp-plugins.txt)autoshield_custom_mu_plugin– Deploys the MU plugin stored in/var/log/cpfenceav/mu-plugin.autoshield_cache_plugin_removal– Removes most cache plugins except LiteSpeed Cache plugin.autoshield_bulk_wp_db_scan– Scans all WP databases for malware each day and sends you an alert if any malware is found.autoshield_bulk_wp_db_optimize– Optimises all WP databases daily to improve performance and reduce overhead.autoshield_security_headers– Adds standard security headers across all WP sites, read more.autoshield_force_plugin_bundle– Forces the installation of mandatory plugins listed in/var/log/cpfenceav/wp-plugin-bundle.txt.autoshield_clear_litespeed_cache– Clears LiteSpeed cache for every WP site daily.autoshield_disable_ls_cache_login_page– Disables login pages ls cache for every WP site daily. (Recommended when using cPFence WAF Captcha)CPF_BACKUP_ENABLED– Enables the built-in WordPress backup system.CPF_REMOTE_BACKUP_ENABLED– Sends WordPress backups to a remote server via SSH.CPF_BACKUP_SSH_PORT– SSH port used by the remote backup target.CPF_BACKUP_RETENTION– Number of backup snapshots kept per site.CPF_BACKUP_SCHEDULE– Comma-separated weekdays (0 = Sun , Example: "1,4" for Monday and Thursday) ordailyfor backups.CPF_WAF– Controls the web-application firewall module.CPFENCE_OWL– Activates lightweight resource and process monitoring.OWL_HISTORY- Stores Owl metrics (~30 days). Disable to stop storage; on main CP servers this also hides charts.BLACKLISTED_USERS– Pipe-separated MySQL usernames whose long queries should be killed. (Deprecated; useOWL_AUTO_MySQLinstead)MAX_EXECUTION_DURATION– Time in seconds before a MySQL query is terminated. (A value of 30 is recommended.)OWL_AUTO_MySQL– Turns automatic slow-query management on or off, read more.EXCLUDED_USERS_AUTO_MySQL– Users exempt from AutoMySQL, separated by|.BLOCKED_COUNTRY / WHITELISTED_COUNTRY– ISO-alpha-2 codes of countries to block or allow, managed via Tools & Utilities > Country Blacklisting / Whitelisting.EMAIL_RECIPIENT– Address that receives notification emails from cPFence.daily_ip_reputation_check– Runs a daily reputation scan on server IPs.CPFENCE_MONITORPRO– Enables external uptime and keyword monitoring, Read more.CPFENCE_LOGSPOT– Permits end-users to view site traffic logs, Read more.CPFENCE_LOGSIZE_LIMIT– Maximum log size per site (in MB) for LogSpot module.WEBSITE_ID_LOGIN– Allows LogSpot access using a numeric site ID, read more.SEND_CPF_UPDATE_NOTIFICATION– Emails you whenever cPFence upgrades itself.SEND_ROOT_LOGIN_ALERT– Emails you when a root SSH login occurs. Whitelisted IPs are excluded.NOTIFY_SCAN_SUCCESS– Send scan success notifications.NOTIFY_BACKUP_SUCCESS– Send backup success notifications.NOTIFY_WP_VULN_REPORT– Send weekly WordPress vulnerability reports.NOTIFY_EMAIL_THREATS– Send alerts for email spam and mailbox threats.NOTIFY_LOAD_ALERTS– Send Owl CPU load alerts.NOTIFY_RESOURCE_ALERTS– Send Owl resource usage alerts.SLACK_NOTIFICATIONS– Sends alerts to Slack if a webhook URL is set, read more.SLACK_WEBHOOK_URL– Incoming webhook used for Slack alerts.CPULoadAverageThreshold– Load average that triggers a resource-usage email alert.MEMORY_THRESHOLD– Percent of RAM usage that triggers alerts.DISK_USAGE_THRESHOLD– Disk usage percentage that triggers alerts.DISK_IO_THRESHOLD– Disk I/O percentage that triggers alerts.INODE_THRESHOLD– Inode usage percentage that triggers alerts.time_diff_wait– Seconds usage must stay high before cPFence sends an alert.email_send_interval– Minimum seconds between successive alert emails.
Configuration File Location
The cPFence configuration file is located at:
/opt/cpfence/config.conf
Applying Changes
IMPORTANT: After making any changes to the configuration file, you must restart cPFence to apply the updates. Use the following command:
cpfence --restart
Alternatively, you can use the command line for changes. Use `cpfence --help` for more information.
