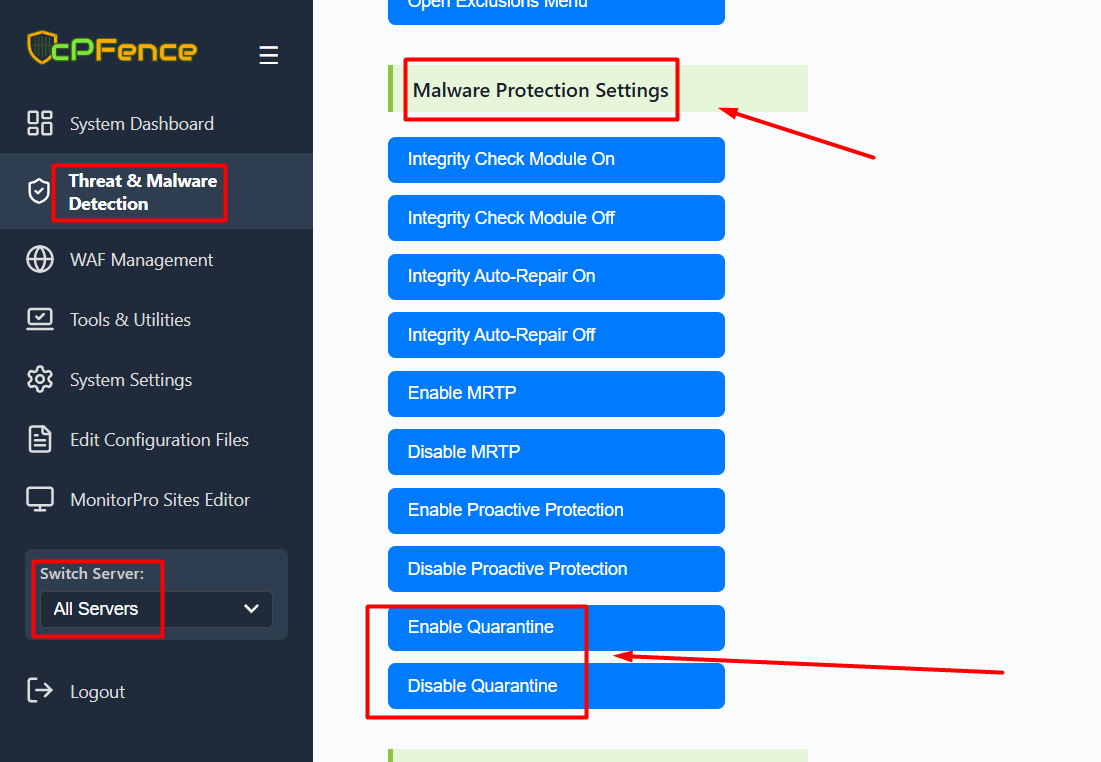
How to Enable/Disable Auto Quarantine in cPFence ?

See also : How Restore Files from Quarantine


The Auto Quarantine feature in cPFence allows detected malware to be automatically isolated by moving infected files to a quarantine directory. This helps secure your system by preventing potential threats from spreading or being executed. Follow the instructions below to enable or disable this feature.


Enabling Auto Quarantine

By default, Auto Quarantine is disabled. To automatically quarantine detected threats, follow these steps:

  1. Run an Initial Scan (Optional but Recommended)
    Before enabling Auto Quarantine, it is recommended to perform a full scan without quarantine to review and whitelist safe files.
    Use the following command to run the scan:
cpfence --full-scan

Review the scan results and whitelist any legitimate files that might have been flagged.

  1. Enable Auto Quarantine
    To enable Auto Quarantine and automatically move infected files to the quarantine directory (/opt/cpfence/quarantined/), use the following command:
cpfence --enable-quarantine

Once enabled, any future detections will be automatically quarantined.


Disabling Auto Quarantine

If you prefer to manually review scan results and take action, you can disable Auto Quarantine at any time:

  1. Disable Auto Quarantine
    To disable Auto Quarantine and stop automatic isolation of detected threats, use the following command:
cpfence --disable-quarantine

When Auto Quarantine is disabled, you will need to manually review the scan results and decide whether to quarantine, delete, or ignore the detected files. See also How to restore files from quarantine.


Quarantine Location

When Auto Quarantine is enabled, all infected files will be moved to the following directory:

/opt/cpfence/quarantined/

You can review the quarantined files here and take further action if necessary.


Summary of Commands

  • Enable Auto Quarantine:
cpfence --enable-quarantine
  • Disable Auto Quarantine:
cpfence --disable-quarantine
  • Run Full Scan Without Quarantine:
cpfence --full-scan

By using Auto Quarantine, you ensure that any detected threats are automatically contained, improving the overall security of your system. However, if you prefer to manually review each scan result, simply disable the feature and monitor the system as needed.

  • 0 utilizatori au considerat informația utilă
Răspunsul a fost util?

Articole similare

How to Enable / Disable Malware Real-Time Protection?

This guide provides instructions for managing Malware Real-Time Protection (MRTP). Enable MRTP...

Does cPFence Provide Protection for Mail Servers?

Yes, cPFence provides email protection, including virus-infected attachments, spam, and...

What is Proactive Scan & How to Enable it?

The Proactive Scan option in cPFence controls the speed of detection and scanning in the Malware...

How to Use cPFence Virus Scanner?

cPFence provides various scanning options to detect and manage potential threats. This guide...

How to Enable or Disable Email Quarantine in cPFence?

cPFence offers the ability to enable or disable email quarantine for handling infected...